Please Note: This article is written for users of the following Microsoft Excel versions: 2007, 2010, 2013, 2016, 2019, 2021, and Excel in Microsoft 365. If you are using an earlier version (Excel 2003 or earlier), this tip may not work for you. For a version of this tip written specifically for earlier versions of Excel, click here: Sequential Page Numbers Across Worksheets.
Written by Allen Wyatt (last updated March 4, 2023)
This tip applies to Excel 2007, 2010, 2013, 2016, 2019, 2021, and Excel in Microsoft 365
Valerie has a business need to get Excel to use sequential page numbers across multiple tabs in a workbook, but she can't figure out how to do it. Each time she begins a new worksheet the page numbers start at 1 again.
There are two approaches you can use to get the page numbering you want. By default, Excel determines what it feels is the best starting page number when printing a worksheet. If you print just a single worksheet, Excel starts the numbering at page 1. If you print multiple worksheets at the same time (create a selection set of worksheet tabs before you start printing), then Excel prints the worksheets sequentially, one after the other, and numbers the pages sequentially as well.
Thus, to get the sequential page numbers you want, you should either select the worksheets you want to print before issuing a single print command or you should display the Print dialog box (Excel 2007) or the Print settings (Excel 2010 and later) and specify that you want to print the entire workbook.
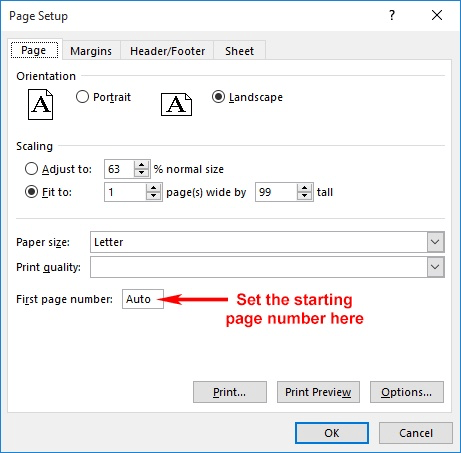
The second approach is to specify, manually, what page number you want Excel to use for a beginning page number. This approach works well when you can't print all your worksheets at once or if the worksheets you need to print are in separate workbooks. All you need to do is display the Page Setup dialog box (display the Page Layout tab of the ribbon and click the small icon at the bottom-right of the Page Setup group) and use the First Page Number box to specify what page number you want Excel to use. (See Figure 1.)

Figure 1. Setting the starting page number.
One final note: You'll want to make sure that you have the headers or footers of your worksheets set up to actually include page numbers. Excel doesn't print them automatically; you need to specify that the header or footer contain a page number. (How you set up the header and footer is covered in other ExcelTips.)
ExcelTips is your source for cost-effective Microsoft Excel training. This tip (7758) applies to Microsoft Excel 2007, 2010, 2013, 2016, 2019, 2021, and Excel in Microsoft 365. You can find a version of this tip for the older menu interface of Excel here: Sequential Page Numbers Across Worksheets.

Best-Selling VBA Tutorial for Beginners Take your Excel knowledge to the next level. With a little background in VBA programming, you can go well beyond basic spreadsheets and functions. Use macros to reduce errors, save time, and integrate with other Microsoft applications. Fully updated for the latest version of Office 365. Check out Microsoft 365 Excel VBA Programming For Dummies today!
Need to copy headers and footers from one worksheet to another? How about from one workbook to another? Here are some ...
Discover MoreAdd subtotals to a worksheet and you can instruct Excel to start each new subtotal section on a new printed page. You may ...
Discover MoreYou can easily create headers and footers for multiple worksheets by working with a selection set of the worksheets you ...
Discover MoreFREE SERVICE: Get tips like this every week in ExcelTips, a free productivity newsletter. Enter your address and click "Subscribe."
There are currently no comments for this tip. (Be the first to leave your comment—just use the simple form above!)
Got a version of Excel that uses the ribbon interface (Excel 2007 or later)? This site is for you! If you use an earlier version of Excel, visit our ExcelTips site focusing on the menu interface.
FREE SERVICE: Get tips like this every week in ExcelTips, a free productivity newsletter. Enter your address and click "Subscribe."
Copyright © 2026 Sharon Parq Associates, Inc.
Comments