Please Note: This article is written for users of the following Microsoft Excel versions: 2007, 2010, 2013, 2016, 2019, and Excel in Microsoft 365. If you are using an earlier version (Excel 2003 or earlier), this tip may not work for you. For a version of this tip written specifically for earlier versions of Excel, click here: Using Custom Add-Ins.

Using Custom Add-Ins

Written by Allen Wyatt (last updated April 11, 2020)
This tip applies to Excel 2007, 2010, 2013, 2016, 2019, and Excel in Microsoft 365


After you have created your own add-in, you can use it in your system. Once the add-in has been loaded, the functions or features in the add-in become available to any other workbook you may have open, or any time you are using Excel. All you need to do to use your add-in is follow these steps:
  1. Display the Excel Options dialog box. (In Excel 2007 click the Office button and then click Excel Options. In Excel 2010 and later versions display the File tab of the ribbon and then click Options.)
  2. At the left side of the dialog box click Add-Ins.
  3. Make sure the Manage drop-down list (at the bottom of the dialog box) is set to Excel Add-ins.
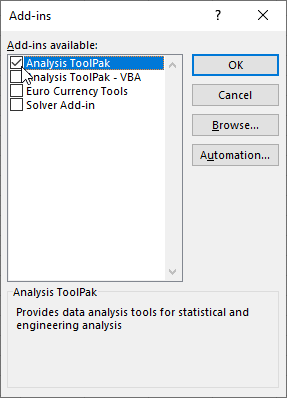
  4. Click the Go button. Excel displays the Add-Ins dialog box. (See Figure 1.)
  5. Figure 1. The Add-Ins dialog box.

  6. If your custom add-in is visible in the dialog box, click the check box beside it and skip to step 9.
  7. Click on the Browse button. Excel displays a standard file dialog box.
  8. Use the controls in the dialog box to locate and select your custom add-in.
  9. Click on OK. The add-in is loaded and made a part of Excel. (You can tell that the add-in is available because it is now listed in the Add-Ins dialog box.)
  10. Click on OK to close the Add-Ins dialog box.

Note:

If you would like to know how to use the macros described on this page (or on any other page on the ExcelTips sites), I've prepared a special page that includes helpful information. Click here to open that special page in a new browser tab.

ExcelTips is your source for cost-effective Microsoft Excel training. This tip (8529) applies to Microsoft Excel 2007, 2010, 2013, 2016, 2019, and Excel in Microsoft 365. You can find a version of this tip for the older menu interface of Excel here: Using Custom Add-Ins.

Author Bio

Allen Wyatt

With more than 50 non-fiction books and numerous magazine articles to his credit, Allen Wyatt is an internationally recognized author. He is president of Sharon Parq Associates, a computer and publishing services company. ...

MORE FROM ALLEN

Printing Multiple Envelopes

Need to print envelopes quite often? An easy way to do it is to create an envelope template, as described in this tip.

Discover More

Detecting Types of Sheets in VBA

When processing workbook information in a macro, you may need to step through each worksheet to make some sort of ...

Discover More

Turning Off Hyperlink Activation

Does it bother you when you enter a URL and it becomes "active" as soon as you press Enter? Here's how you can turn off ...

Discover More

Solve Real Business Problems Master business modeling and analysis techniques with Excel and transform data into bottom-line results. This hands-on, scenario-focused guide shows you how to use the latest Excel tools to integrate data from multiple tables. Check out Microsoft Excel 2013 Data Analysis and Business Modeling today!

More ExcelTips (ribbon)

Tracing Dependent Cells

Cells that use the information in a particular cell are called dependent cells. Excel provides auditing tools that allow ...

Discover More

Tracing Precedent Cells

Cells that affect another cell are called precedent cells. If you need to know which cells affect a particular cell, ...

Discover More

Tracing Precedents and Dependents Clears Undo Stack

Excel normally allows you to undo actions you take so that you can "step back" through what you may have been doing. ...

Discover More
Subscribe

FREE SERVICE: Get tips like this every week in ExcelTips, a free productivity newsletter. Enter your address and click "Subscribe."

View most recent newsletter.

Comments

If you would like to add an image to your comment (not an avatar, but an image to help in making the point of your comment), include the characters [{fig}] (all 7 characters, in the sequence shown) in your comment text. You’ll be prompted to upload your image when you submit the comment. Maximum image size is 6Mpixels. Images larger than 600px wide or 1000px tall will be reduced. Up to three images may be included in a comment. All images are subject to review. Commenting privileges may be curtailed if inappropriate images are posted.

What is 8 + 0?

There are currently no comments for this tip. (Be the first to leave your comment—just use the simple form above!)


This Site

Got a version of Excel that uses the ribbon interface (Excel 2007 or later)? This site is for you! If you use an earlier version of Excel, visit our ExcelTips site focusing on the menu interface.

Newest Tips
Subscribe

FREE SERVICE: Get tips like this every week in ExcelTips, a free productivity newsletter. Enter your address and click "Subscribe."

(Your e-mail address is not shared with anyone, ever.)

View the most recent newsletter.