Please Note: This article is written for users of the following Microsoft Excel versions: 2007, 2010, 2013, 2016, 2019, and 2021. If you are using an earlier version (Excel 2003 or earlier), this tip may not work for you. For a version of this tip written specifically for earlier versions of Excel, click here: Deleting Everything Except Formulas.
Written by Allen Wyatt (last updated June 6, 2024)
This tip applies to Excel 2007, 2010, 2013, 2016, 2019, and 2021
At the beginning of each year Richard makes a copy of the previous year's Excel workbook. To get ready for the new year's data, he then needs to delete everything in the copy except for formulas. Richard wonders if there is a quick way to do this.
Actually, there is a very quick way to manually delete all the non-formula information in a worksheet. Follow these steps:

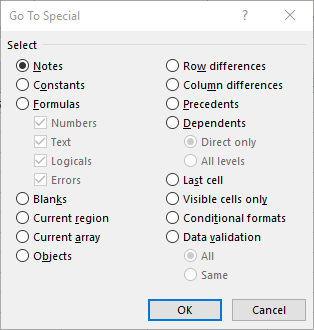
Figure 1. The Go To Special dialog box.
If you have a lot of worksheets in a workbook and you want to delete all the constants from each of the worksheets, you might want to use a macro that automates the above steps for the entire workbook.
Sub DelAllConstants()
    Dim wks As Worksheet
    Dim rng As Range

    For Each wks In ThisWorkbook.Worksheets
        On Error Resume Next
        Set rng = wks.Cells.SpecialCells(xlCellTypeConstants, 23)
        On Error GoTo 0
        If Not rng Is Nothing Then
            rng.ClearContents
        End If
        Set rng = Nothing
    Next
    Set wks = Nothing
End Sub
Note:
ExcelTips is your source for cost-effective Microsoft Excel training. This tip (11168) applies to Microsoft Excel 2007, 2010, 2013, 2016, 2019, and 2021. You can find a version of this tip for the older menu interface of Excel here: Deleting Everything Except Formulas.

Best-Selling VBA Tutorial for Beginners Take your Excel knowledge to the next level. With a little background in VBA programming, you can go well beyond basic spreadsheets and functions. Use macros to reduce errors, save time, and integrate with other Microsoft applications. Fully updated for the latest version of Office 365. Check out Microsoft 365 Excel VBA Programming For Dummies today!
Defined names can be a great boon when working in a worksheet. Usually names are available throughout an entire workbook, ...
Discover MoreNeed to make sure that information entered in a worksheet is always in a given unit of measurement? It's not as easy of a ...
Discover MoreEach cell in a worksheet can hold quite a bit of information. If you want to see the information in the cell without the ...
Discover MoreFREE SERVICE: Get tips like this every week in ExcelTips, a free productivity newsletter. Enter your address and click "Subscribe."
2020-05-11 07:08:42
John Mann
I notie thar right at the befining of this tip, it is apecified that this Rkichard does this every year. I have a similar situation with the accounts of a small non-ptofit group of whifh I sm the treasurer. My wrok book has quite a lot of sheets,with one worksheet for each period of the finanical year, then summary sheets for echa period and for the year.
I solved the problem of starting a new workbook each year the easy way - I saved a blank copy of the workbook as atemplate. Now each year I simply creat a new worknook using the template. A simialr method, thoufh more work and more error prone would be to save an empty copy of the workbook, then each year upen the copy, do a Save As to make the new uear's work nook. This runs the risk of foretting to do the Save As before starting to enter data, and the extra step of opening then doing the Save As. The template file is to me the most obvious solution to Richard's original question.
2020-04-28 11:18:43
Allen
Peter,
See the ExcelTips FAQ, here: https://excelribbon.tips.net/faq.html
The third Q&A answers your question.
-Allen
2020-04-28 11:08:09
Peter Clarke
Maybe I missed something when I subscribed to this blog a few months ago, but I understood that you included Excel for Mac in your discussions. I don't think I have yet to see any reference to Excel for Mac. As above, you give the "Press F5. Excel displays the Go To dialog box." On my MacBook Pro I push fn+F5 to get the Preference screen, not a Go to Special screen. (By the way, you only have Notes highlighted yet your text says, "Make sure the Constants radio button is selected. (This is extremely important—don't click any other option in the dialog box.)". Mixed messages here.
There ARE differences between the two platforms of Excel. It would be proper to not waste Mac users' time by identifying just what flavours of Excel that you are referring to.
Thanks. Be well.
Peter
2020-04-27 04:51:00
David Shepherd
Depending on the size and complexity of the workbook, another option might be to define a named range that includes all user-entry cells. Then use the named range to select the cells for deletion.
2020-04-26 14:29:31
Peter Atherton
Clifton
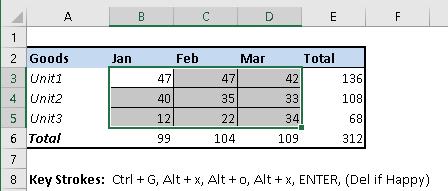
The image was supposes to show the selection, this taken with the Snipping Tool is hopefully, better.
(see Figure 1 below)

Figure 1. Selection for deletion
2020-04-26 14:11:19
Peter Atherton
Clifton
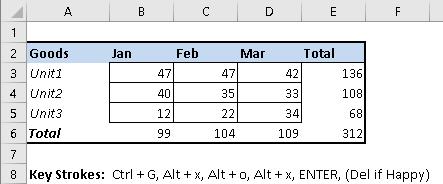
You could always follow the steps until OK ans see what is selected. The method deletes all Headers as well. I'd suggest the following Key Strokes: Ctrl + G, Alt + x, Alt + o, Alt + x, ENTER, (Del if happy)
The ALT + x de-selects Text
(see Figure 1 below)

Figure 1.
2020-04-25 17:49:56
Clifton Schnarr
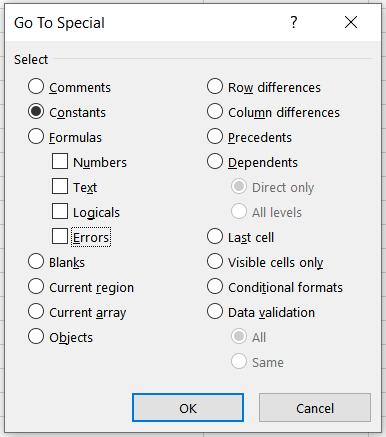
Hi Allen. Thanks for the helpful tip. Just one note. It would be helpful when you post, if you post an image of the settings you actually instruct us to set. In the posting your screen shot of the "Go To Special" dialogue box shows "Notes" being selected. If others like me have a tendency to go by the images in the post step by step, then we would not get the desired result. Also once we select "Constants" the options for "Formulas" (> Numbers, > Text, > Logicals, and > Errors) all become active and are all checked by default even though the "Formulas" radio button is not selected. You don't tell us what to do at this point. Do we need to uncheck these four options before proceeding, or is it not necessary? I will attempt to attach the dialogue box with only the constants radio button selected for your use. Many thanks for all your great tips! (see Figure 1 below)

Figure 1.
Got a version of Excel that uses the ribbon interface (Excel 2007 or later)? This site is for you! If you use an earlier version of Excel, visit our ExcelTips site focusing on the menu interface.
FREE SERVICE: Get tips like this every week in ExcelTips, a free productivity newsletter. Enter your address and click "Subscribe."
Copyright © 2026 Sharon Parq Associates, Inc.
Comments