Please Note: This article is written for users of the following Microsoft Excel versions: 2007, 2010, 2013, 2016, 2019, 2021, and Excel in Microsoft 365. If you are using an earlier version (Excel 2003 or earlier), this tip may not work for you. For a version of this tip written specifically for earlier versions of Excel, click here: Capturing a Screen.
There may be times when you need to include a screen shot within your Excel worksheet. Windows makes it rather easy to capture a screen shot. In fact, there are a few ways you can do it. These tips (from our sister WindowsTips website) will help you track down the method that is best for your needs:
https://tips.net/T12560
https://tips.net/T11884
https://tips.net/T12558
If the method you choose results in the screen shot being in the Clipboard, you can then paste it directly into your Excel worksheet. If, instead, the method results in a file being saved to disk, you can place the graphic file into a workbook just as you would any other graphic file.
If you prefer to edit the image before placing it in Excel, you can use your favorite graphic editing program to do the changes. Save the screen short in a graphics file (if your capture method doesn't do it automatically), do the editing, save the edited graphic, and then place it into your worksheet.
You should understand that once the screen is placed in your workbook, you can move and manipulate it the same as any other graphic. Also note that adding quite a few graphics to your worksheet can dramatically increase the size of the file in which your workbook is saved.
ExcelTips is your source for cost-effective Microsoft Excel training. This tip (12512) applies to Microsoft Excel 2007, 2010, 2013, 2016, 2019, 2021, and Excel in Microsoft 365. You can find a version of this tip for the older menu interface of Excel here: Capturing a Screen.

Best-Selling VBA Tutorial for Beginners Take your Excel knowledge to the next level. With a little background in VBA programming, you can go well beyond basic spreadsheets and functions. Use macros to reduce errors, save time, and integrate with other Microsoft applications. Fully updated for the latest version of Office 365. Check out Microsoft 365 Excel VBA Programming For Dummies today!
Excel makes it easy to place a graphic in a worksheet. Once there, you may want to chop off a side (or two) of the ...
Discover MoreBackground pictures are repeated over and over again (tiled) by Excel. If you want them to not be tiled, you may be out ...
Discover MoreWant your shapes to really "pop" off the page? Add a drop shadow to them, as described in this tip.
Discover MoreFREE SERVICE: Get tips like this every week in ExcelTips, a free productivity newsletter. Enter your address and click "Subscribe."
2024-06-10 10:47:38
J. Woolley
Re. my previous comment below, I should have added these two image related macros:
3. The PasteImageInComment macro will paste an image from the clipboard or from a file as background in a cell's unthreaded comment (Note).
4. The ClipboardImage macro simply saves an image from the clipboard to a file of type PNG.
The PasteImageInComment macro utilizes the following function:
=ImageInComment(ImageFile, [Target}, [ScaleFactor], [RotateAngle], [NoAuthor])
where ImageFile (text) is a filename of type BMP, GIF, JPG, PNG, TIFF, WMF, etc. This function applies the image from ImageFile as Fill Effect in Target's unthreaded comment. The image's size is adjusted by ScaleFactor, which defaults to 1. If RotateAngle is 90, 180, or 270, it specifies degrees of clockwise image rotation; any other value is ignored (default is 0). If a new comment is necessary and NoAuthor is TRUE, the new comment will have blank text; NoAuthor's default is FALSE. The text of existing comments is never altered.
Finally, the following function returns an array of properties for ImageFile's ActiveFrame:
=ListImageProperties(ImageFile)
Expect 2 columns and 18 rows.
See https://sites.google.com/view/MyExcelToolbox/
2024-06-09 22:49:38
Alex Blakenburg
I typically want the rectangle tool to select just a portion of the screen. I find the fastest way of doing this is to use <windows>+<shift>+S. Left mouse click and drag to select the rectangle to copy.
This will put it on to your clipboard and if you have notification turned on for the Snipping Tool will also put it in there in case you want to mark up the image. It has the added benefit that in most cases it will include the drop down menu you had open at the time, which can be rather elusive.
Having the screen clipping tool in your quick access toolbar in Excel or other office application ie Word or Outlook is another way to quickly grab a screen shot from somewhere.
2024-06-09 10:09:32
J. Woolley
Erik mentioned the Camera tool in his comment below.
For an equivalent of the Camera tool, copy (Ctrl+C) a region of the active sheet, then select another cell on any sheet and pick Home > Paste > Linked Picture (Alt+H+V+I).
My Excel Toolbox includes the following two macros to create an image of a range of cells. In addition to cell values, the images will include visible portions of shapes or charts from the copied range.
1. The SelectionImage macro copies the selected range as a static image on the clipboard and optionally saves it in a file.
2. The DynamicImage macro copies the selected range and pastes it as a dynamic image in any sheet of any workbook. All changes visible in the source range will be reproduced in the dynamic image (assuming the source is open in Excel). The result is a simple dashboard.
See https://sites.google.com/view/MyExcelToolbox/
2024-06-08 17:37:05
Erik
Two notes related to capturing a screen:
1) How Excel manages size and quality of images can have a big impact on file size and retained image quality. You can find he settings in File/Options/Advanced.
(see Figure 1 below)
2) You can use Excel's Camera command to make a living image of any area of a worksheet to paste somewhere else within Excel. "Living" meaning when anything inside the captured area changes, the image you pasted also changes. You can add the Camera command to your ribbon by going to File/Options/Customize Ribbon and selecting Camera. You might have to choose "All Commands" for the list, as it probably isn't listed under "Popular".
(see Figure 2 below)
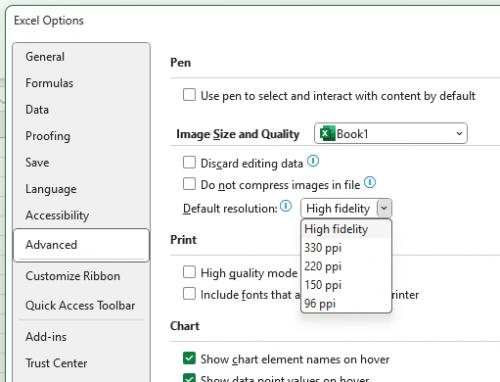
Figure 1. Define how Excel handles images
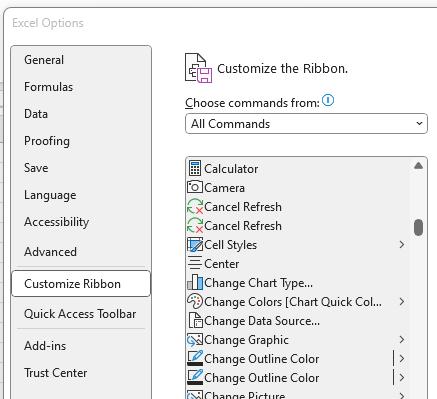
Figure 2. How to add the Camera command
Got a version of Excel that uses the ribbon interface (Excel 2007 or later)? This site is for you! If you use an earlier version of Excel, visit our ExcelTips site focusing on the menu interface.
FREE SERVICE: Get tips like this every week in ExcelTips, a free productivity newsletter. Enter your address and click "Subscribe."
Copyright © 2026 Sharon Parq Associates, Inc.
 Please Note:
This article is written for users of the following Microsoft Excel versions: 2007, 2010, 2013, 2016, 2019, 2021, and Excel in Microsoft 365. If you are using an earlier version (Excel 2003 or earlier), this tip may not work for you. For a version of this tip written specifically for earlier versions of Excel, click here:
Please Note:
This article is written for users of the following Microsoft Excel versions: 2007, 2010, 2013, 2016, 2019, 2021, and Excel in Microsoft 365. If you are using an earlier version (Excel 2003 or earlier), this tip may not work for you. For a version of this tip written specifically for earlier versions of Excel, click here:
Comments