Please Note: This article is written for users of the following Microsoft Excel versions: 2007, 2010, 2013, 2016, 2019, and 2021. If you are using an earlier version (Excel 2003 or earlier), this tip may not work for you. For a version of this tip written specifically for earlier versions of Excel, click here: Saving Common Formulas.
Written by Allen Wyatt (last updated September 24, 2024)
This tip applies to Excel 2007, 2010, 2013, 2016, 2019, and 2021
Sometimes, creating just the formula you want can be a victory all in itself. Once created, formulas become valuable, and you may need to use them over and over again in different worksheets you use. Wouldn't it be great to have a way to paste commonly used formulas in a workbook, the same way you can paste clip art or other common objects?
Unfortunately, such a capability is not resident within Excel. There are a couple of things you can do to make your formulas more accessible, however. One thing you can do is keep a text document (a Notepad document) on your desktop and store your commonly used formulas in it. With Excel open, you can open the text document, copy the desired formula to the Clipboard, and quickly paste it in the desired cell of the workbook.
Another possible solution is to assign names to your formulas.
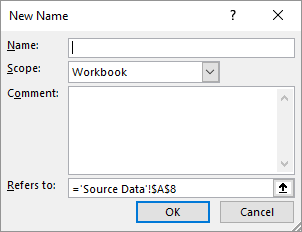
Figure 1. The New Name dialog box.
Now, whenever you want to use the formula, you simply enter an equal sign and the name you gave to the formula in step 8. Even though the name shows in the cell, the formula assigned to the name is actually used in doing the calculation. Since the formula used relative references (you got rid of the dollar signs), it is always relative to where you use the name in the worksheet.
Another approach works great if you are comfortable with macros and with the VB Editor. This approach involves making your common formulas part of your Personal macro workbook. This workbook is opened whenever you start Excel and is designed primarily for macros and customizations that you want available whenever you use Excel. But there is no reason it cannot be used for common formulas, as well.
Assuming you haven't yet created a Personal macro workbook, follow these steps:
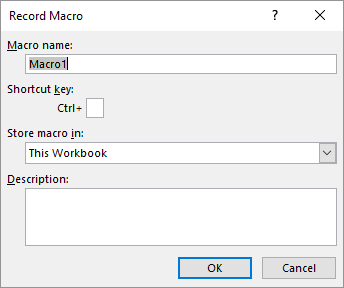
Figure 2. The Record Macro dialog box.
The macro you recorded is now stored in your newly created Personal macro workbook. To see the code that you created, open the VB Editor (Alt+F11). In the upper-left corner of the editor is the Project Explorer; it lists all the various pieces and parts accessible through the editor. One of the items in the Project Explorer should be PERSONAL.XLSB. If you expand this object (click the small plus sign to the left of the project name), you should see a Modules folder. Expand the Modules folder, and it contains Module1. If you double-click on this module you see the macro you just recorded; it looks something like this:
Sub Macro1()

' Macro1 Macro
'

'
    Range("A4").Select
End Sub
You can now select this code and delete it, since you don't need it anymore. You can then place other macros or user-defined functions in the module so they will be available.
What about formulas? Copy them to the Clipboard and paste them in the module, outside of any procedures defined therein. All you need to do is make sure you preface the formula with an apostrophe, so that the VB Editor thinks you are entering a comment. When you need the formulas at a later time, just go to the VB Editor, open the module, copy the formula, and paste it into the workbook where you need it.
Finally, you could also place your common formulas into AutoCorrect entries. Follow these steps:

Figure 3. The AutoCorrect dialog box.
You can now use your formula as you would any other AutoCorrect entry. Just type whatever you used in step 9 and then press Enter. The name is replaced with the full formula.
Note:
ExcelTips is your source for cost-effective Microsoft Excel training. This tip (6135) applies to Microsoft Excel 2007, 2010, 2013, 2016, 2019, and 2021. You can find a version of this tip for the older menu interface of Excel here: Saving Common Formulas.
Solve Real Business Problems Master business modeling and analysis techniques with Excel and transform data into bottom-line results. This hands-on, scenario-focused guide shows you how to use the latest Excel tools to integrate data from multiple tables. Check out Microsoft Excel 2013 Data Analysis and Business Modeling today!
Want to add up a bunch of scores, without including the lowest one in the bunch? You can make a small change to your ...
Discover MoreWant to create a sequential pattern using formulas? It's easy to do if you take a look at how your data repeats. This tip ...
Discover MoreYou can easily sum a series of values in Excel, but it is not so easy to sum the absolute values of each value in a ...
Discover MoreFREE SERVICE: Get tips like this every week in ExcelTips, a free productivity newsletter. Enter your address and click "Subscribe."
2024-09-25 04:20:54
Philip
@Mike J, a simple "replication" of Veronica's formula using Switch would look like this:
=SWITCH(LEN(B2);
6;"00"& B2;
10;"00"& B2;
11;"0"& B2;
7;"0"& B2;
8;B2;
12;B2;"")
The advantage being that you don't need to worry about parenthesis count when nesting conditions, and also it offers a default value if none of the conditions are met (in this case "").
Note: SWITCH only is available for Excel 2019 and up (including 365 and Web)
2024-09-24 09:27:10
Mike J
@Philip, I also am unfamiliar with the SWITCH function. Could you provide a 'SWITCH()' solution to Veronica Lee's problem?
2024-09-24 05:19:41
Philip
@Veronica Lee, on a side note (not related to storing formulas), the example formula you show would potentially be much simplified if you would use SWITCH instead of IF ... (most people that come to me with questions about Excel are not aware of the existence of this function)
2020-03-11 13:19:31
JDR
Why go all the way to Notepad? Just paste the formulae into an Excel workbook, preceding each formula with an apostrophe (') so it behaves like text. Then you will see a list of all your formula on an Excel tab and can copy and paste whenever wherever.
2019-11-22 13:41:36
Veronica Lee
How would I reference the cell that I'm trying to use the formula / macro on? I created a shortcut, which is genius bc I didn't even know we can do that, but changing the cell reference eliminates this efficient shortcut. Would I have to create a UDF?
=IF(OR(LEN(B2)=6,LEN(B2)=10),"00"&B2,
IF(OR(LEN(B2)=11,LEN(B2)=7),"0"&B2,
IF(OR(LEN(B2)=8,LEN(B2)=12),B2,"")))
Thank you!
<3
2019-10-06 21:29:27
Col Delane
Why on earth would you go to all this trouble to save formulas in a form that is foreign to their native habitat? Isn't the very reason you want to store these formulas is to use them in an Excel spreadsheet? If so, why not save your "formula library" (which can include the use of supporting cells, etc. to provide a complete demonstration) in an Excel spreadsheet where they will actually work as stored?
So, create a Personal Macro Workbook as described. Note that the PMW is nothing more than a bog-standard Excel workbook, but with a magical power to enable macros stored therein to be made available to all open workbooks. But it is still a simple workbook that will operate just like every other Excel workbook, with as many sheets as you want, etc.
Insert a sheet and name it "Formulas" or whatever name you want.
Now use this sheet as a warehouse in which to save all your sample formulas, employing some cataloguing concepts to include some structure, labels, tags, etc. so that you can easily find the formula you want at a later time. Even use different sheets if you like for different types of formulas, or for any other Excel thing you want to keep handy. (My PMW is my always-at-hand Excel toolbox, full of samples covering Data Validation, Conditional Formatting, Defined Names, templates, macros, dates, etc. ) Just simple thinking, really!
Got a version of Excel that uses the ribbon interface (Excel 2007 or later)? This site is for you! If you use an earlier version of Excel, visit our ExcelTips site focusing on the menu interface.
FREE SERVICE: Get tips like this every week in ExcelTips, a free productivity newsletter. Enter your address and click "Subscribe."
Copyright © 2025 Sharon Parq Associates, Inc.
 Please Note:
This article is written for users of the following Microsoft Excel versions: 2007, 2010, 2013, 2016, 2019, and 2021. If you are using an earlier version (Excel 2003 or earlier), this tip may not work for you. For a version of this tip written specifically for earlier versions of Excel, click here:
Please Note:
This article is written for users of the following Microsoft Excel versions: 2007, 2010, 2013, 2016, 2019, and 2021. If you are using an earlier version (Excel 2003 or earlier), this tip may not work for you. For a version of this tip written specifically for earlier versions of Excel, click here:
Comments