Written by Allen Wyatt (last updated January 10, 2026)
This tip applies to Excel 2007, 2010, 2013, 2016, 2019, 2021, 2024, and Excel in Microsoft 365
Bill has two workbooks in which he does most of his work during the day. He wonders if there is a way to open these two workbooks at the same time, rather than needing to open them individually.
There are many, many ways you can do this. In this tip I'm just going to examine eight (!) different ways you can have them open at the same time. Some of these methods involve the use of Windows and others involve just Excel.
You know you can open an Excel workbook directly from Windows by simply double-clicking the workbook name. If you want to open multiple workbooks, follow these steps:
When Windows goes through its startup procedures, it does a lot of work. One of the things it does (among many others) is to open whatever files or run whatever programs are stored in a special Startup folder. To display this folder, open a File Explorer window and type the following:
shell:Startup
When you press Enter, you should see a folder similar to the following. (See Figure 1.)
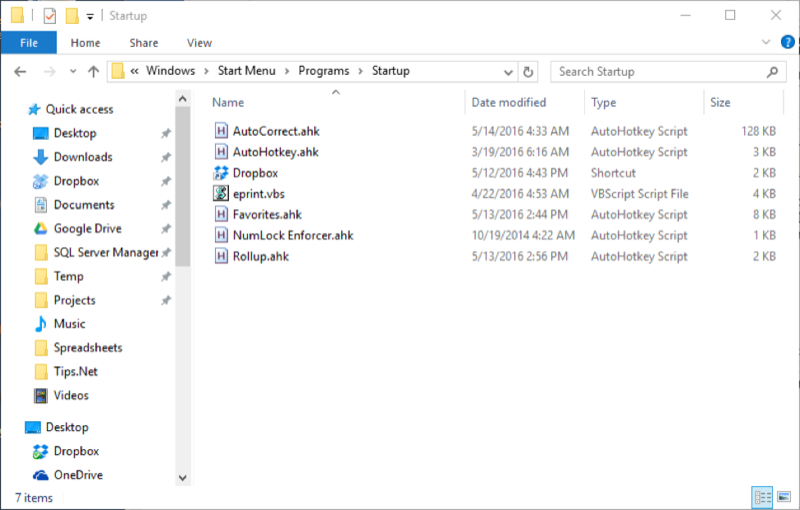
Figure 1. The Startup folder.
There may be many or only a few items in the folder. If you want, you can create shortcuts to your two workbooks and place those shortcuts in this special Startup folder. The next time Windows is started, the two workbooks will be automatically opened.
You should note that this approach works only when you start Windows after having previously completely shut down. If you simply put your PC to sleep, the Startup folder doesn't come into play when the PC awakens.
Batch files are the "old school" way of automating a series of commands, dating all the way back to the advent of DOS. They still work great, though, and you can create a batch file that will open two workbooks. All you need to do is use Notepad to create a text file that contains the following two lines:
start MyWorkbook1.xlsx
start MyWorkbook2.xlsx
Obviously, you should change the names of the workbooks to reflect the names of the workbooks you want to open. When you save the text file, rename it to something descriptive, such as this:
OpenBooks.bat
Note the change of the filename extension from txt to bat; this is critical. Once renamed, you can double-click the batch file and it should run and open the workbooks.
We are all familiar with the Open dialog box; it is what is often used in Excel to, well, open files. Using the dialog box, you can open multiple workbooks at once, in a manner that is similar to how you open multiple files in Windows. Just follow these steps:
Excel has a special folder that is traditionally known as the XLSTART folder. Any workbooks placed in this folder are automatically opened whenever you start Excel. The trick can be to find the XLSTART folder, because it isn't always in the same location on every system.
The easiest way to find the folder is to use the search capabilities of Windows itself. (Do this while Excel is not running.) Once located, you have two options:
Either way, when you next start Excel, the two desired workbooks should open as you desire.
This approach is easy to accomplish within Excel. Just create a new folder and move the two workbooks into that folder. Then, within Excel, follow these steps:

Figure 2. The General section of the Advanced Excel Options.
Now, the next time you start Excel, those two workbooks (and anything else in that folder) should open automatically. If the workbooks don't open, check to make sure that you put the correct path into the field in step 4.
There are actually two approaches you can use when it comes to macros. The first is to create a macro that explicitly opens both workbooks. It should look very similar to the following:
Sub OpenMyWorkbooks()
    Workbooks.Open Filename:="C:\Users\Harry\Documents\Book1.xlsx"
    Workbooks.Open Filename:="C:\Users\Harry\Documents\Book2.xlsx"
    Windows.Arrange (xlArrangeStyleTiled)
End Sub
Just change the full pathnames to the workbooks you want to open, and then run the macro when you want them to open. You can even, if desired, configure Excel so the macro is available on the ribbon or assign it to a shortcut key.
The second approach is a variation on the forgoing macro—name it Workbook_Open and place it in the ThisWorkbook module of your Personal.xlsb workbook. Then, whenever you start Excel the two workbooks will automatically be opened.
If you are using either Excel 2007 or Excel 2010 you can create a workspace that uses your two workbooks. (Workspaces were removed from Excel with the release of Excel 2013.)
The workspace file is saved with the filename extension XLW. You can, within Windows, double-click the workspace file and Excel starts and opens both of the workbooks in the workspace.
Note:
ExcelTips is your source for cost-effective Microsoft Excel training. This tip (13698) applies to Microsoft Excel 2007, 2010, 2013, 2016, 2019, 2021, 2024, and Excel in Microsoft 365.

Best-Selling VBA Tutorial for Beginners Take your Excel knowledge to the next level. With a little background in VBA programming, you can go well beyond basic spreadsheets and functions. Use macros to reduce errors, save time, and integrate with other Microsoft applications. Fully updated for the latest version of Office 365. Check out Microsoft 365 Excel VBA Programming For Dummies today!
Excel has the capability to automatically open workbooks when you first start the program. You may not want to have one ...
Discover MoreIf you want to know whether a workbook has been saved or not, Excel provides an easy-to-find indicator. If you want a ...
Discover MoreNeed to open a bunch of workbooks from within Excel? It's easy to do when you construct a selection set in the Open ...
Discover MoreFREE SERVICE: Get tips like this every week in ExcelTips, a free productivity newsletter. Enter your address and click "Subscribe."
There are currently no comments for this tip. (Be the first to leave your comment—just use the simple form above!)
Got a version of Excel that uses the ribbon interface (Excel 2007 or later)? This site is for you! If you use an earlier version of Excel, visit our ExcelTips site focusing on the menu interface.
FREE SERVICE: Get tips like this every week in ExcelTips, a free productivity newsletter. Enter your address and click "Subscribe."
Copyright © 2026 Sharon Parq Associates, Inc.
Comments