Written by Allen Wyatt (last updated December 15, 2025)
This tip applies to Excel 2007, 2010, 2013, 2016, 2019, and 2021
When John emails .XLSM (macro enabled) Excel files, some recipients are only able to open the workbook in a Protected View. This causes all sorts of different results/errors. John wonders if there is a way to either prevent this or provide the recipient with instructions to open the workbook without going into Protected View.
Ready for a trip down memory lane? In the early days of the Internet, people could send Excel workbooks as attachments, and recipients could double-click them and open them with no problem, macros or not.
Simple, right? It was, until bad actors started adding malicious macro code to the workbooks. (This also happened with Word documents.) Open the workbook, the macro ran, and your system was compromised. It was a bad situation.
So, Microsoft started clamping down on macros. First, they separated macro-enabled workbooks (.XLSM) from regular workbooks (.XLSX). Second, they added the Trust Center to Office applications, including Excel, that indicates how incoming workbooks should be handled.
For someone (like John) who sends out workbooks, there is not much that can be done. Why? Because if a "good actor" could circumvent the precautions, so could a "bad actor," and things would be right back where they were a couple of decades ago.
The solution is to educate the recipients on how to enable the opening of the workbooks. Here are the steps that someone would need to do:
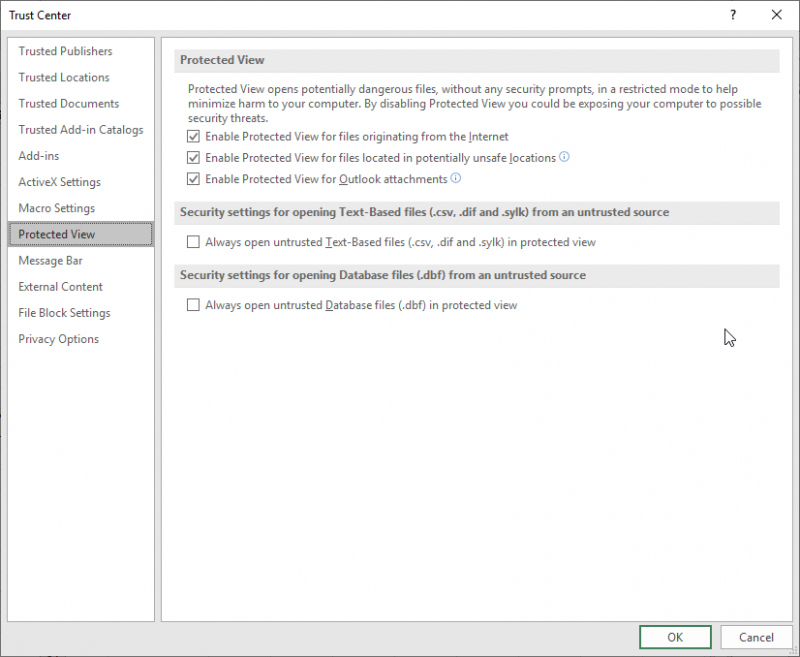
Figure 1. The Protected View options in the Trust Center dialog box.
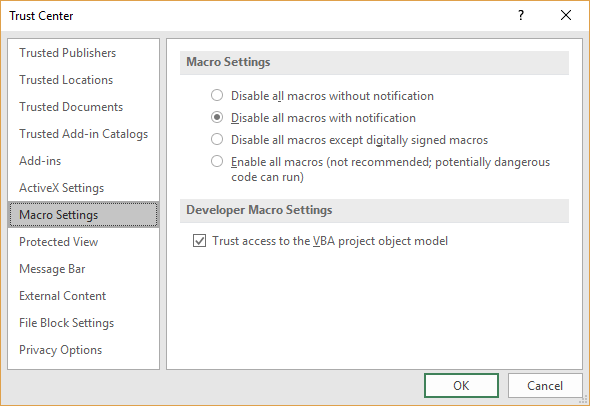
Figure 2. The Macro Settings in the Trust Center dialog box.
This will allow your recipients to open the attached workbooks. The macros won't run automatically, but the user will have the option, upon opening, to enable the macros.
There are two huge caveats here. First, if your recipient is in a corporate environment, taking these steps may really tick off the IT department, as they may have rules about what an employee can or cannot do with macros. If that is the case, your recipient should work with the IT folks to determine how to best use the workbook you are sending.
Second, your recipient will need to make sure that he or she saves your workbook on their computer before trying to open it. I've seen lots of people simply double-click an e-mail attachment in order to open it. In such a case, even if the above steps are followed, there is a good chance the workbook will still open in Protected View. Why? Because in the Protected View options (step 4) there is an option that says "Enable Protected View for files located in potentially unsafe locations." The temporary folders used by e-mail programs to store attachments are one of those "potentially unsafe locations," and therefore the workbook may not open.
Now, there is a time when none of the above will work—when the recipient has filters and blocks in place that prohibit the receipt of e-mail messages that have Excel workbooks (especially macro-enabled workbooks) as an attachment. This may sound like an extreme precaution, but there are many companies that have such restrictions. In that case, your recipient will need to work with their IT department to figure out how to receive and use the workbook you want to send.
ExcelTips is your source for cost-effective Microsoft Excel training. This tip (12696) applies to Microsoft Excel 2007, 2010, 2013, 2016, 2019, and 2021.

Dive Deep into Macros! Make Excel do things you thought were impossible, discover techniques you won't find anywhere else, and create powerful automated reports. Bill Jelen and Tracy Syrstad help you instantly visualize information to make it actionable. You�ll find step-by-step instructions, real-world case studies, and 50 workbooks packed with examples and solutions. Check out Microsoft Excel 2019 VBA and Macros today!
You can store all sorts of information in a worksheet, including Web addresses. If you want to open those addresses in a ...
Discover MoreIs your worksheet information destined for a Web page? Here's how you can specify the fonts that should be used when ...
Discover MoreNeed a quick link within a document to some external data? You can paste information so that Excel treats it just like a ...
Discover MoreFREE SERVICE: Get tips like this every week in ExcelTips, a free productivity newsletter. Enter your address and click "Subscribe."
2025-12-15 07:06:07
Dave Bonin
Here's another option I've used with some success in a big corporate environment:
Include a "splash sheet" in your workbook. This sheet should include a warning to the user that macros are not enabled, along with instructions on how to enable them. You can also include a warning not to open the file directly from outlook.
Then write a small macro that hides the splash sheet when the workbook is opened. Workbook_open() event.
Users with macros enabled will see your workbook with the splash screen hidden.
Users with macros disabled will see the splash screen with helpful instructions.
When you save your to-be-distributed workbook, make sure the splash sheet is the active sheet. If you can code macros, you can easily do this.
You could even add some code to recognize you and use that to decide how to open and save your workbook.
2021-12-13 10:26:54
J. Woolley
Mea culpa. I should have used Google Search more carefully. See https://support.microsoft.com/en-us/office/add-remove-or-view-a-trusted-publisher-87b3d5a3-b68c-4023-87c4-7cc78a44d7ed#__toc311529723
2021-12-13 10:18:52
J. Woolley
By the way, the sequence described in my previous comment is the ONLY method I have discovered that will add a Trusted Publisher. If someone knows of another procedure, I would be very interested.
2021-12-12 13:45:06
David Gray
Thank you @J. Woolley for adding the illustrated detail. I would usually have done that myself, but I was running out of steam, and I had several other matters that needed my attention before I completely ran out.
2021-12-12 11:51:00
J. Woolley
@David Gray
Re. "When you send the first workbook that contains a signed VBA project, the recipient has the option of installing the digital certificate in the Trusted Publishers store on their machine."
1. The recipient will see a Security Warning (see Figure 1 below)
2. The recipient must click the "Macros have been disabled" link, NOT the "Enable Content" button.
3. The recipient will see a new Security Warning and must click that "Enable Content" button and pick "Advanced Options" (see Figure 2 below)
4. The recipient can then pick the "Trust all documents from this publisher" radio-button (see Figure 3 below)
That will make the publisher a Trusted Publishers on the recipient's computer.

Figure 1.
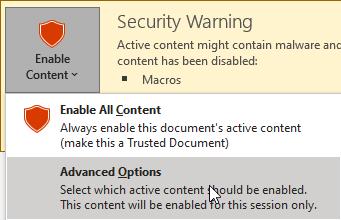
Figure 2.
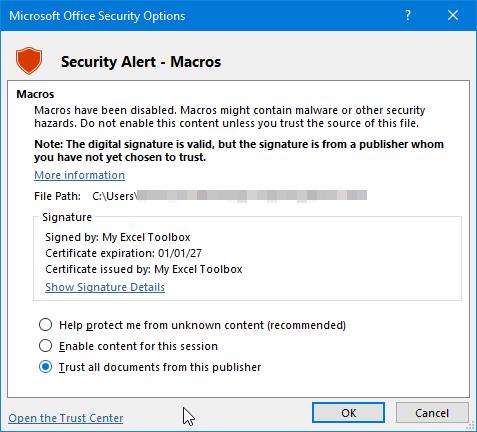
Figure 3.
2021-12-12 10:56:44
J. Woolley
@David Gray
You make a good point. For more on this subject, see https://support.microsoft.com/en-us/office/digitally-sign-your-macro-project-956e9cc8-bbf6-4365-8bfa-98505ecd1c01 and https://knowledge.digicert.com/solution/SO7000.html
2021-12-12 01:40:54
David Gray
Another option that I expected to see mentioned is digitally signing the macros. When you send the first workbook that contains a signed VBA project, the recipient has the option of installing the digital certificate in the Trusted Publishers store on their machine. Thereafter, future signed workbooks are recognized as originating from a trusted publisher.
If you are on the signing side of things, take care that you add the timestamp URL to the Windows Registry on your machine so that your signatures are timestamped. A timestamped signature lasts forever, even after the certificate that signed it expires, which it will inevitably do in no more than about 3 years.
Got a version of Excel that uses the ribbon interface (Excel 2007 or later)? This site is for you! If you use an earlier version of Excel, visit our ExcelTips site focusing on the menu interface.
FREE SERVICE: Get tips like this every week in ExcelTips, a free productivity newsletter. Enter your address and click "Subscribe."
Copyright © 2026 Sharon Parq Associates, Inc.
Comments